Clerk IDs are a great way to associate transactions with the employees that completed them.
When this feature is enabled, employees are assigned a unique identifier that they must enter in order to perform a transaction.
This feature allows to produce transaction reports and track financial data by employee.
TO ADD A CLERK ID
Navigate to https://manage.ackroo.com and sign in.
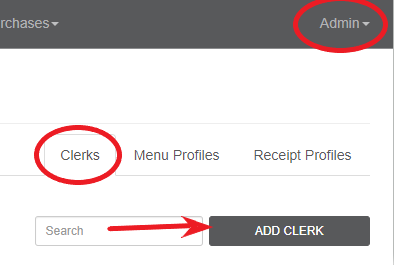
- Select the Admin drop-down menu and select Point of Sale.
- Select the Clerks sub-menu tab.
- Select ADD CLERK

- Select the Business and Location for which the employee works and enter an identifier as well as the employees first and last name, then select OK
- The Business is the parent company for the location to which the employee works.
- The Location is the actual locale from which the employee works.
- The Identifier is the unique number that the employee will use when processing a transaction.
- The first and last name associates the identifier with an employee.
Note: Clerk IDs should be:
- Numeric values only if processing on a debit/credit terminal with a number keypad only (i.e. 1234)
- Numeric or Alphanumeric values if processing on a virtual terminal which accepts typed entries (i.e. jsmith01)
- Should be kept confidential to ensure no one is able to impersonate another employee when processing a transaction.
TO ENABLE CLERK MODE
A) ON A VIRTUAL TERMINAL
Navigate to https://manage.ackroo.com and sign in.
- Select the Locations tab
- Beside the requested location, Select ACTION, then Edit
- Check off Enable Clerk Authentication
- Select OK to close and save.
B) ON A DEBIT TERMINAL
- Select Ackroo from the terminal
- Select Preferences
- Select Advanced >> Password 112233
- Select Configuration
- Select Clerk Mode >> Set to ON
- Once set, you can return to the previous menu(s) using the Red Cancel key.
A Clerk Number will now be required prior to processing any transaction.
NOTE: In order to recognize CLERK ID Numbers on a Verifone or Ingenico debit terminals, a Settings Update must be performed to synchronize clerk IDs to the terminal:
- Select Ackroo from the terminal
- Select Preferences
- Select Updates
TO VIEW CLERK IDs
Navigate to https://manage.ackroo.com and sign in.
- Select the Point of Sale menu item.
- Select the Clerks sub-menu tab.
The Clerk IDs are linked to a business and location, and they cannot be modified or deleted.

TO CHANGE A CLERK ID
The Clerk Identifier is linked to the business and location, and it cannot be edited. A new Clerk ID can be assigned to your employee, and the previous Clerk ID can be suspended.
To assign a new Clerk ID, follow these steps:
- Select ADD CLERK
- Select the Business and Location for which the employee works and enter an identifier as well as the employees first and last name, then select OK
To suspend the employee's previous Clerk ID, see the following section.
TO SUSPEND A CLERK
It is possible to suspend a Clerk ID in order to restrict impersonation when accessing the terminal options.
To suspend a Clerk ID, follow these steps:
- Enter relevant information in the search field. (Identifier, name, or location)
- Select ACTION next to the desired Clerk.
- Select Suspend
TO EDIT A CLERK ID
The Clerk Identifier is linked to the business and location, and it cannot be edited. The Clerk's name can be modified.
To edit a Clerk name, follow these steps:
- Enter relevant information in the search field. (Identifier, name, or location)
- Click the Action button next to the desired Clerk.
- Select Edit
Note: These changes have an immediate effect on the web-based Virtual Terminal app. In order to enable these features on your Verifone or Ingenico terminals, you must first perform a Settings Update to synchronize your clerk IDs.
